Getting Started
Welcome to the start of your journey with SASH. Below you will find links to help and assist you with getting started.
SASH Big picture
SASH by its heart is a journaling system where you can create a SASH Journal to keep your related information in the cloud.
If you have a SASH Controller, you can use the SASH Journal to control it and assign a SASH Profile which will determine its behaviour.
Your SASH Profile will contain all the rules for the controller to execute continuously until a new profile is loaded.
The process to follow if you have a SASH Controller and want to start using it is:
-
Create an account in SASH.
-
Download the SASH mobile application. SASH Remote
-
Claim your new SASH controller on your account.
-
Create a SASH Profile for the controller with all your rules.
-
Create a SASH Journal and assign which SASH controller you want to control with which SASH profile.
The SASH Journal will contain all your information from your SASH Controller with a place for you to add new journal items as desired.
Claiming my new SASH Controller
This is a short tutorial on how to claim your new SASH Controller.
Once you have purchased a SASH Controller, the controller must first be claimed on your account so that
it is available for use.
-
Download the SASH Remote application from the Google Play Store. Support for Apple coming soon.
-
If you have not registered an account in SASH, first register a new account or log in with an existing account.
-
Ensure that the SASH Smart Environment Sensor and SASH camera is plugged in, then switch on your SASH Controller.
-
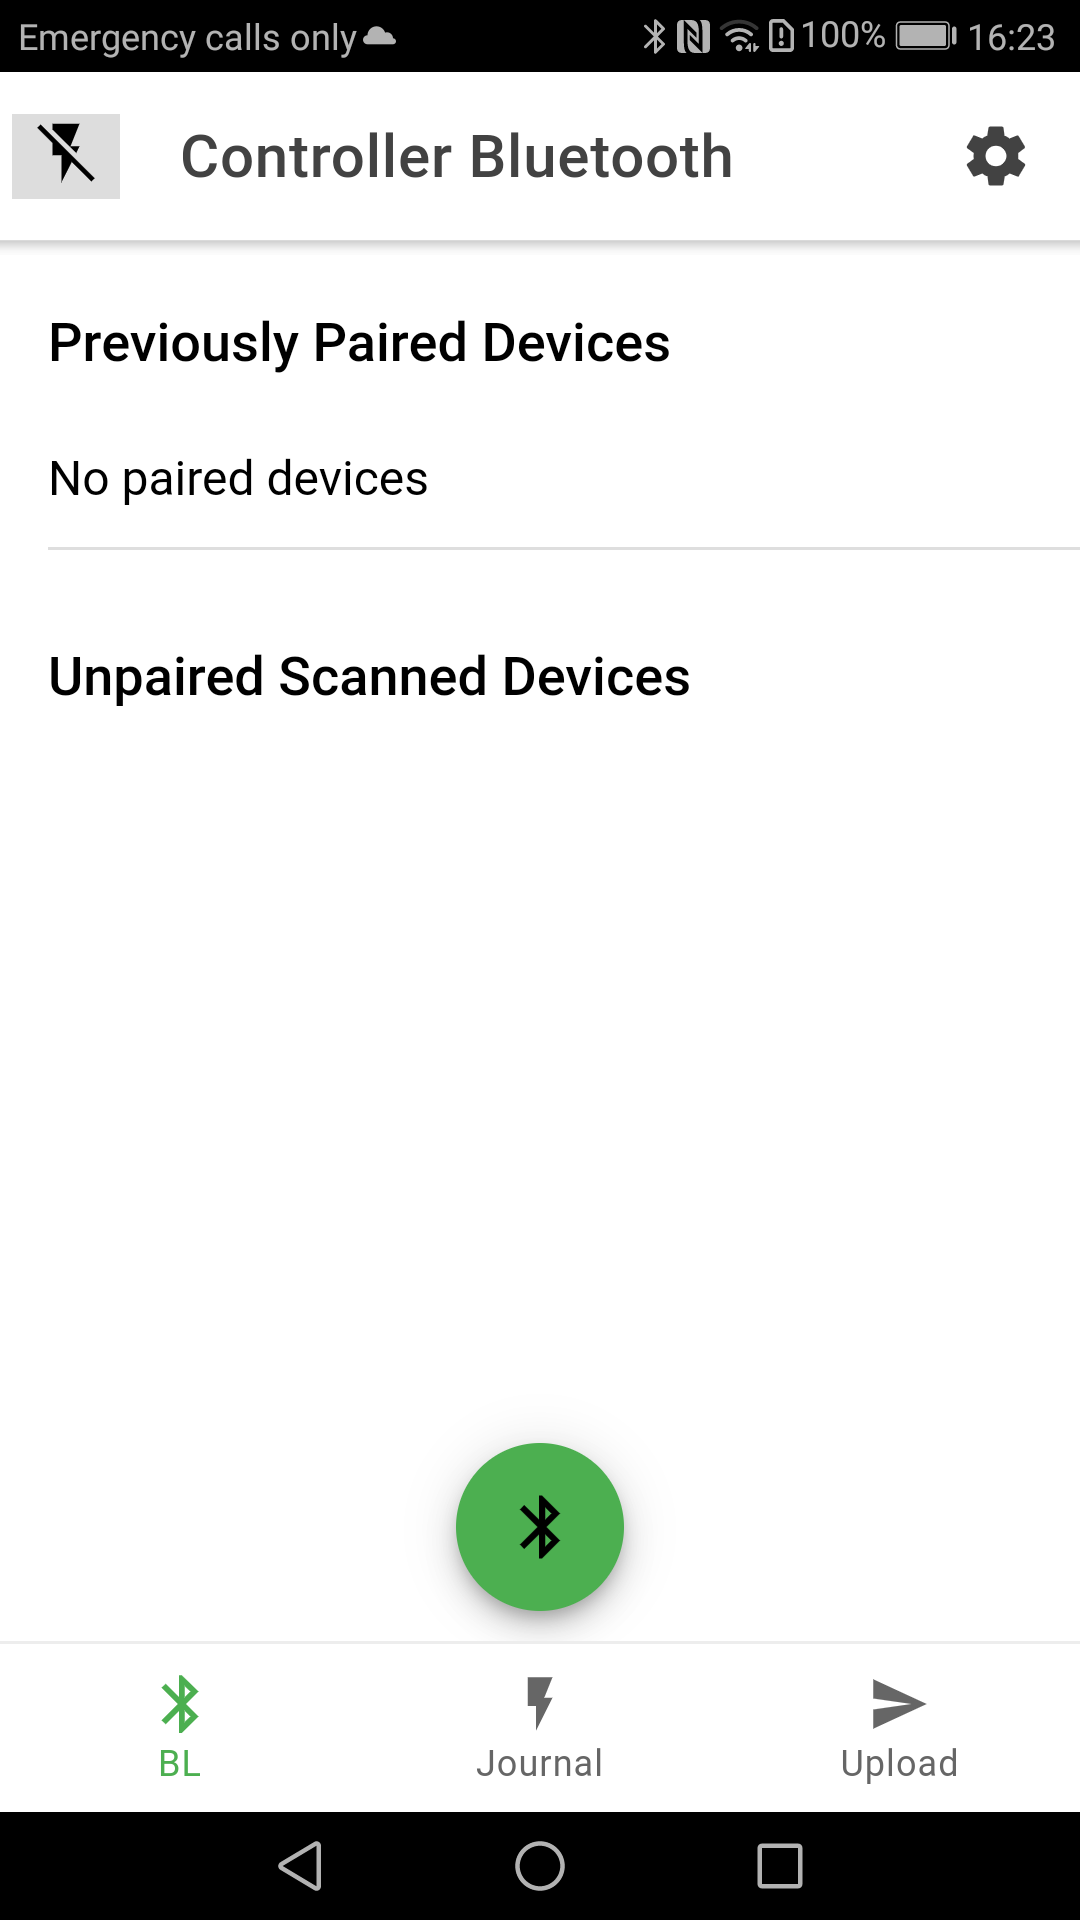
Make sure your phone's Bluetooth is enabled and the SASH Remote application is running on your phone.
-
Navigate to the Bluetooth screen and scan for any SASH Controllers within distance by clicking the green Bluetooth button.
-
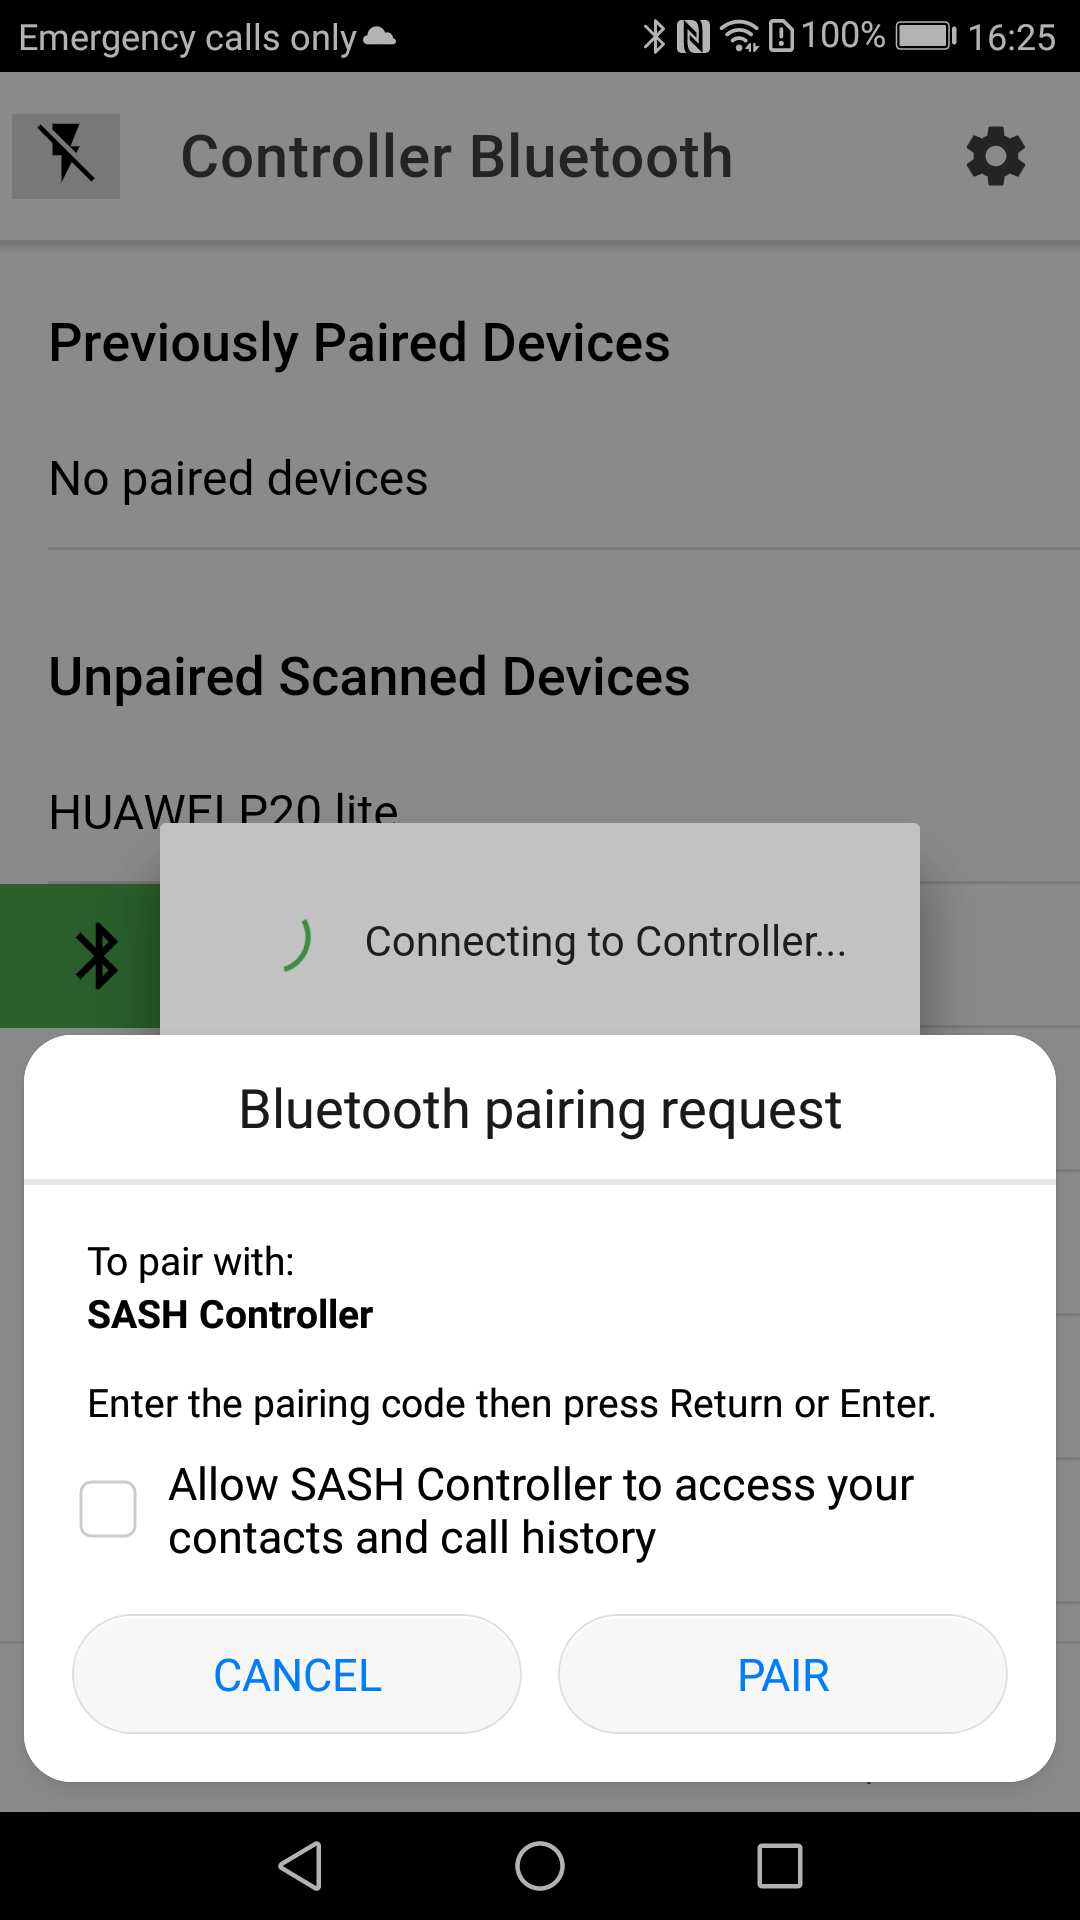
Any new and unclaimed controllers will present with a name of 'SASH Controller'.
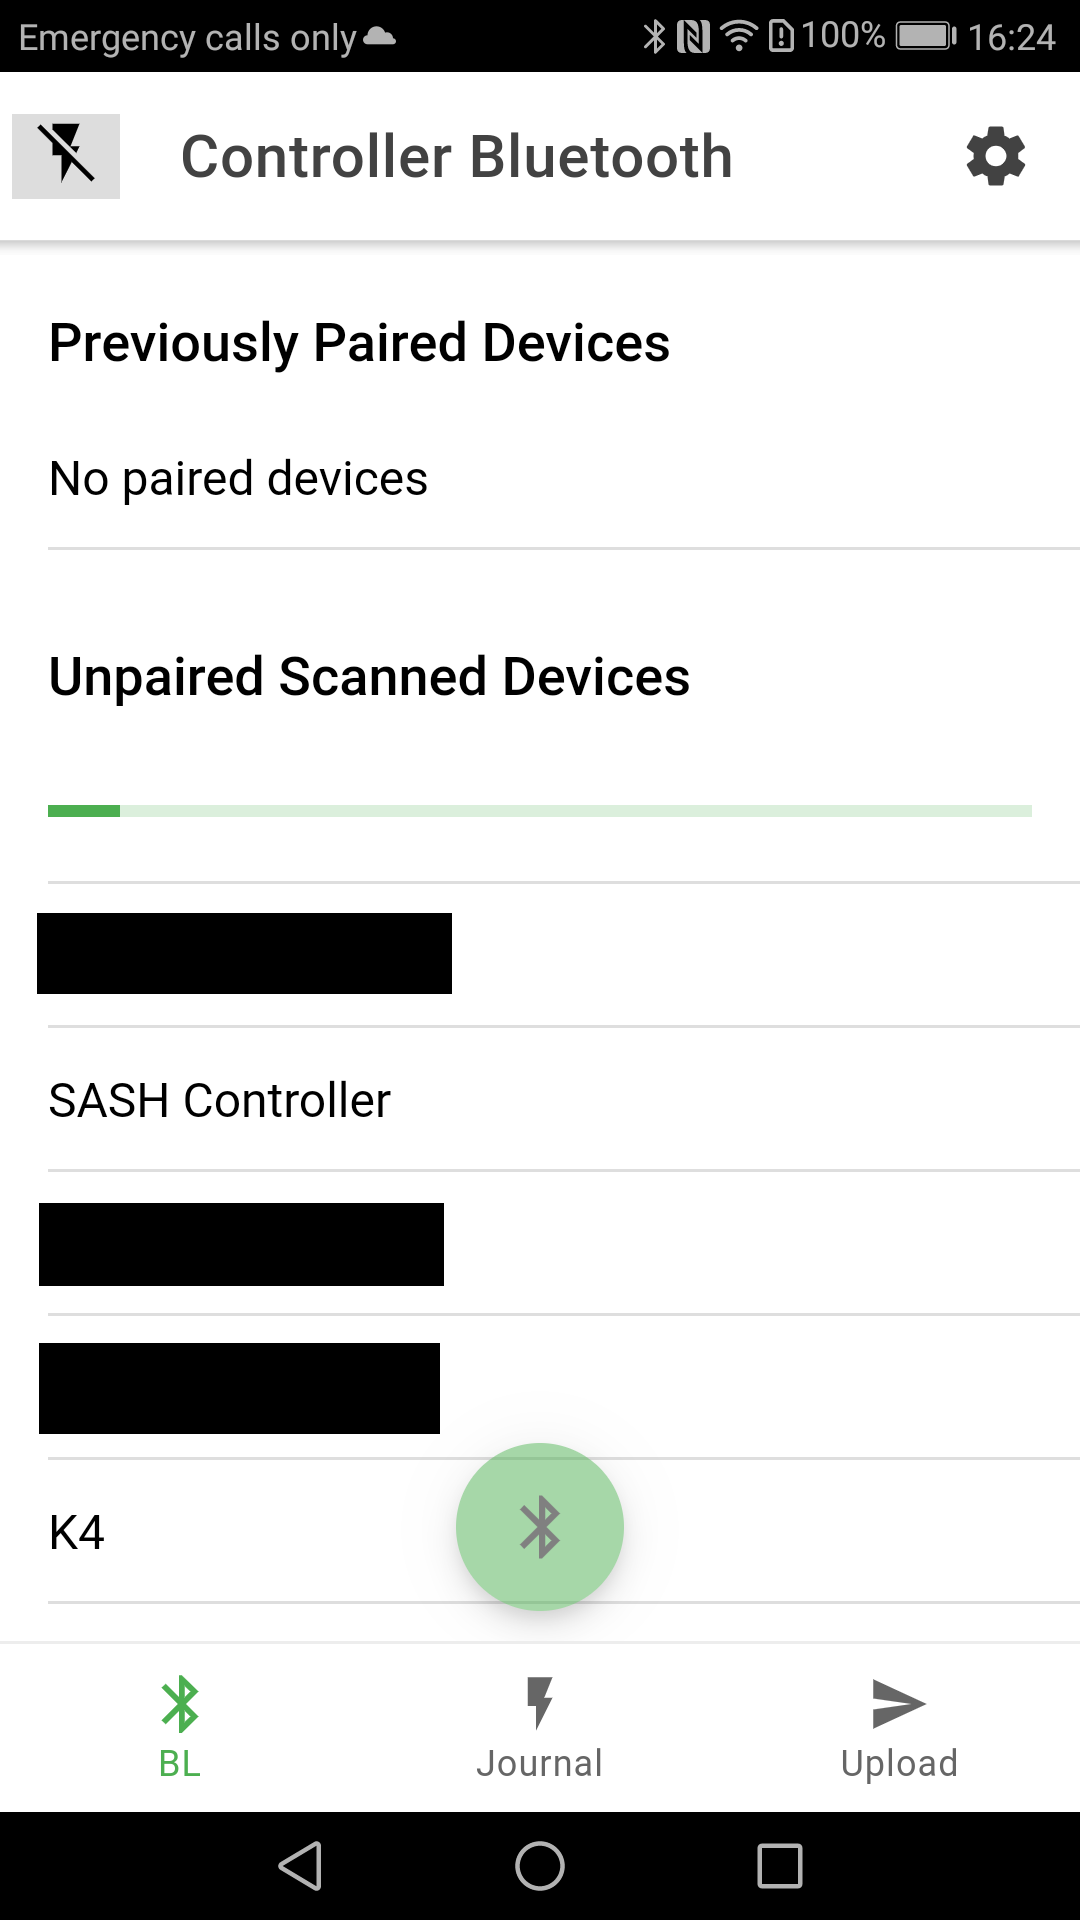
-
To connect to the SASH controller, slide across the controller and click on the green Bluetooth icon.
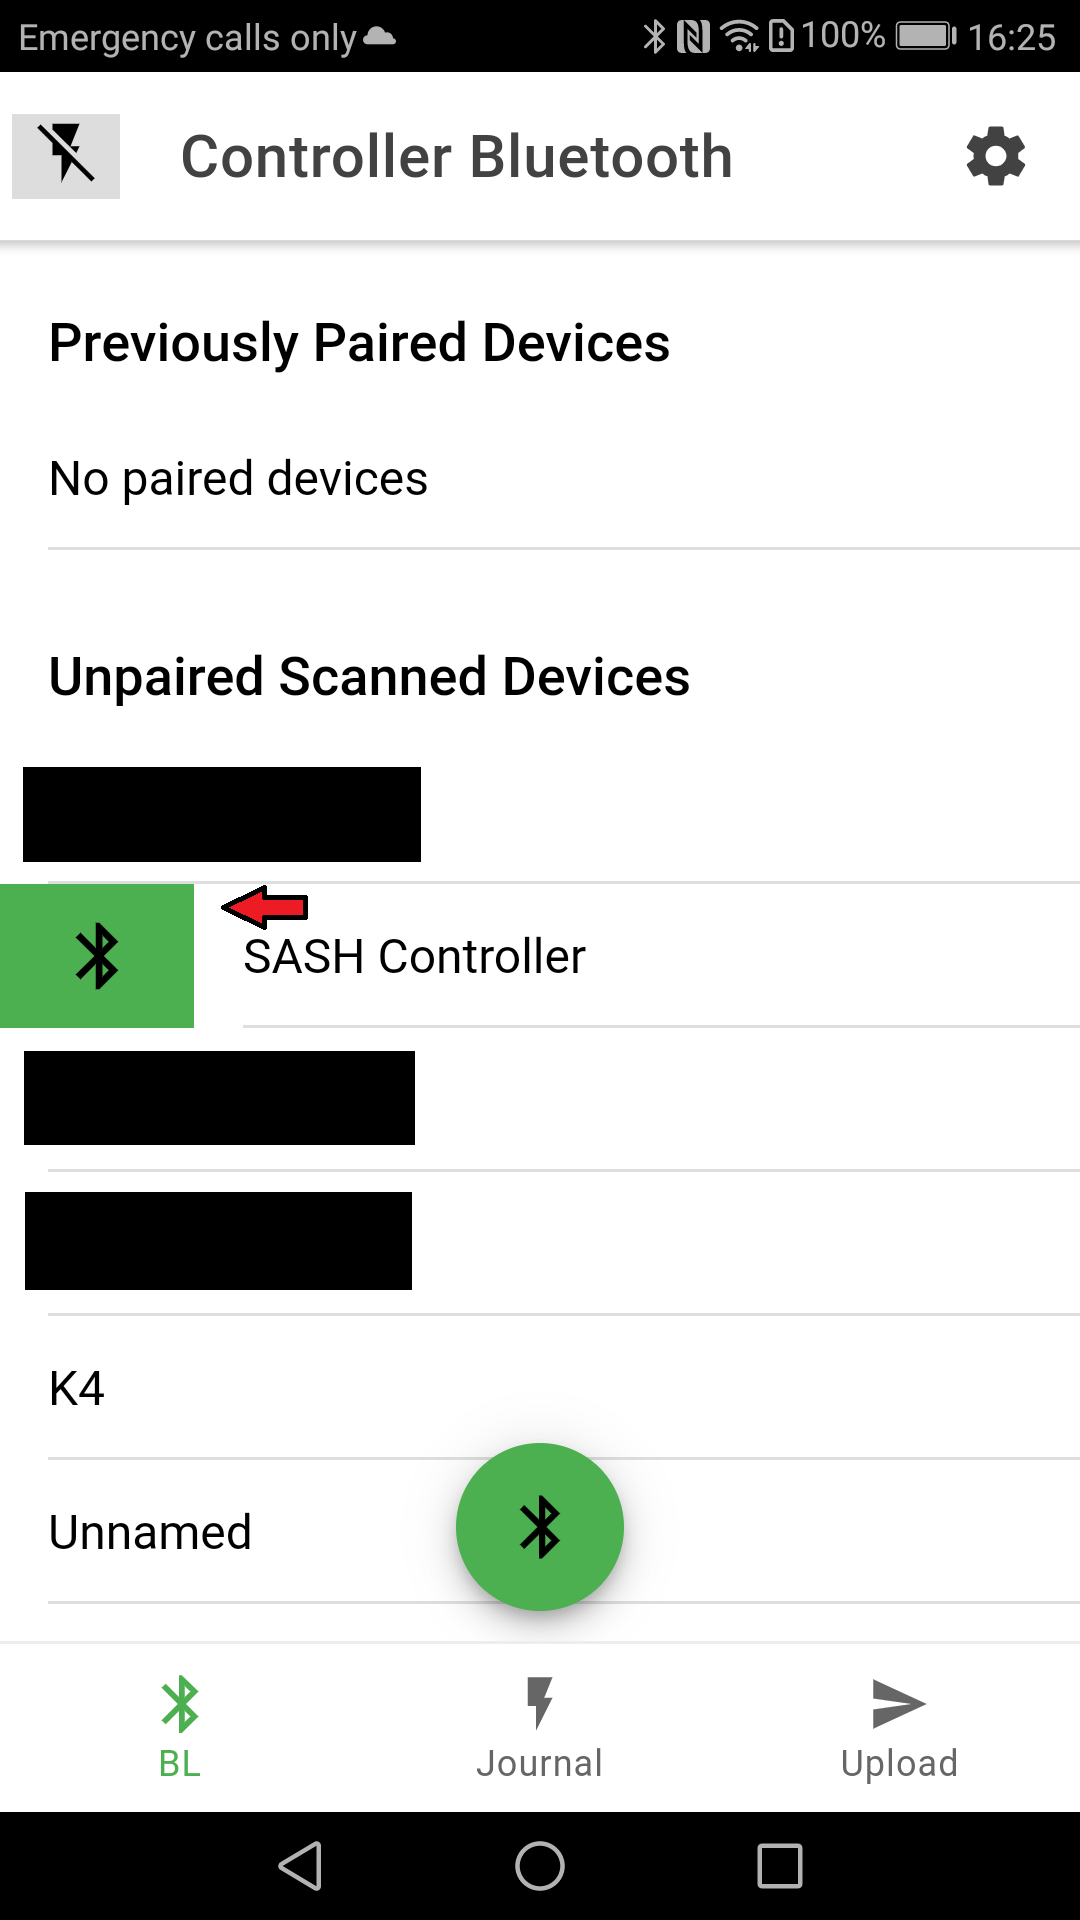
Please note that after you have claimed your controller, it will move up to the Previously Paired Devices section.
-
If this is the first time the mobile phone and the SASH Controller are connecting, you will have to allow Bluetooth pairing on the phone, by clicking on the PAIR button.
-
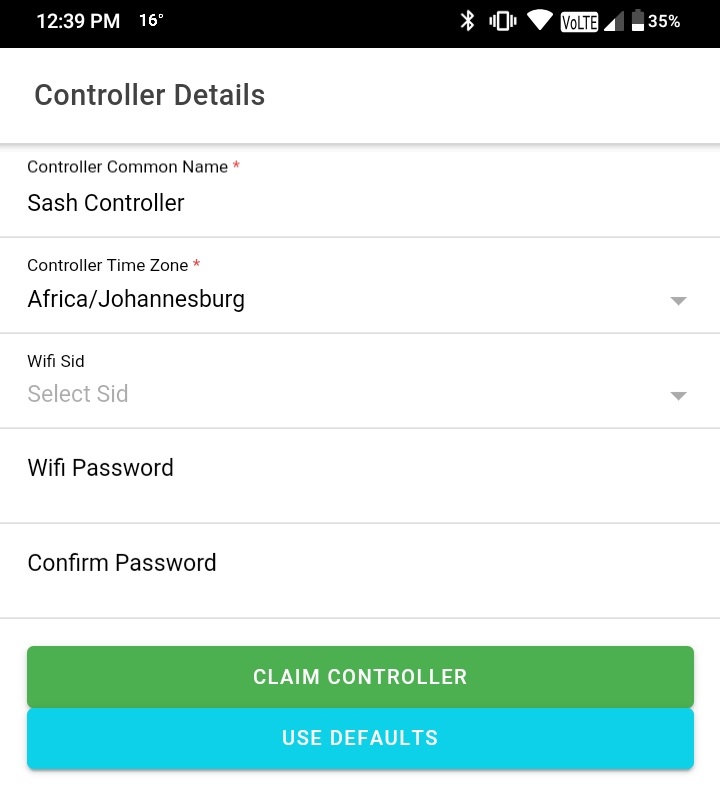
Provide the following details to claim the controller:
-
Common name: Your personal name for the controller to identify it later again if you have multiple SASH Controllers.
-
Time Zone: The time zone that the controller must run in. This will default to your phone's time zone.
Note: This is only used for advanced users where multiple time zones are present in a country. -
Wifi credentials: Your home Wifi hotspot connection details. Same as when you connect a phone to your home network.
-
-
Click the claim button and wait for the claiming process to complete and the controller to reboot.
The controller will reboot as part of the claiming process.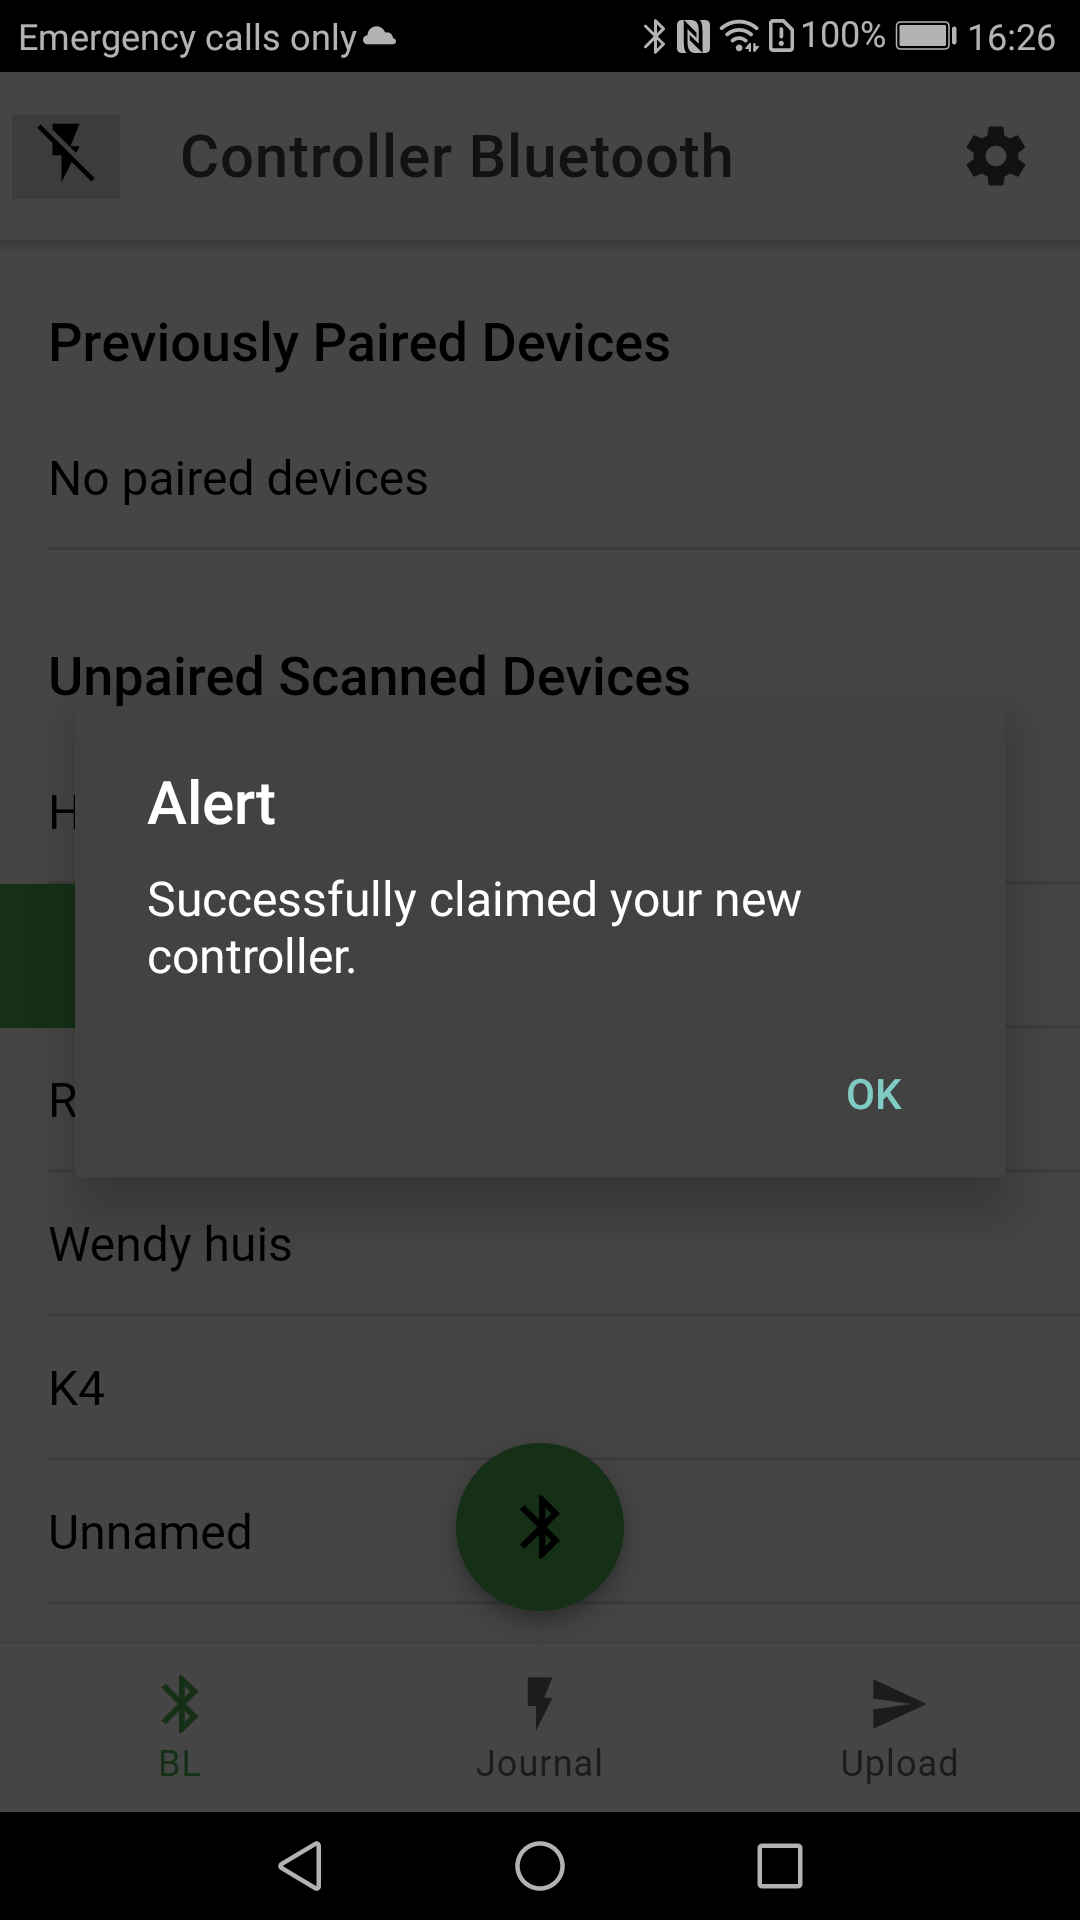
-
Please note: After a controller is claimed and successfully connects to the internet, it will perform a firmware upgrade if it is needed.
This may result in the controller being unresponsive for 10/20 minutes.
-
After the SASH Controller has been claimed on your account, the live dashboard will be shown.
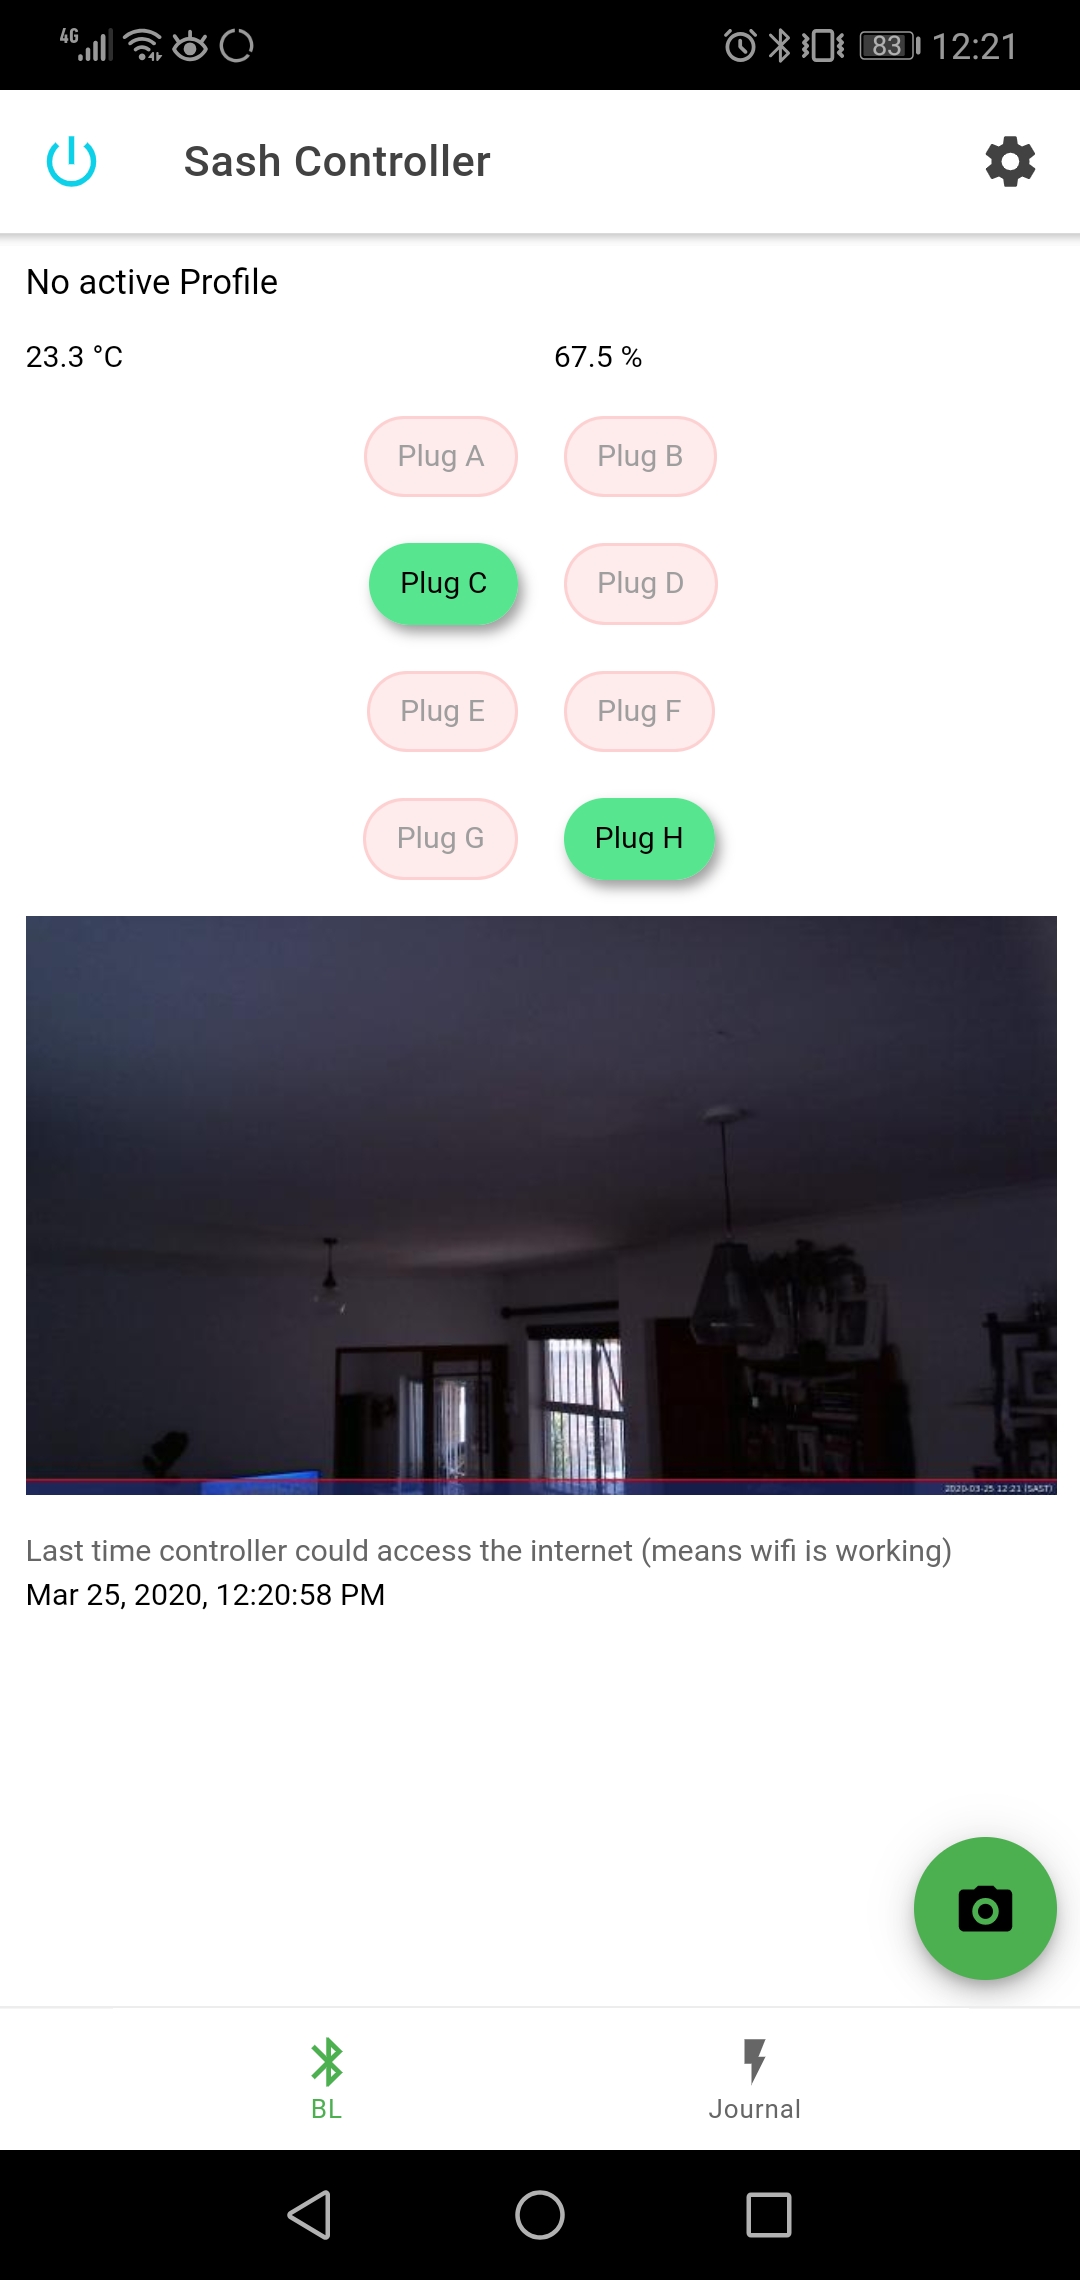
This dashboard can be used for:
-
Monitoring the temperature and humidity values for proper sensor placement during setup of your growroom.
-
Switching the individual plugs on and off for setup testing.
-
Capturing images with the camera to properly align during setup of your grow room.
-
Monitor the last time the controller could successfully connect to the internet through your wifi network.
-
-
Pause here and use the last successful communication time to make sure your controller is connecting to the internet.
To refresh this screen, click on the setting icon and save the setting screen.
-
While connected to the SASH Controller through Bluetooth, a configuration screen is available.
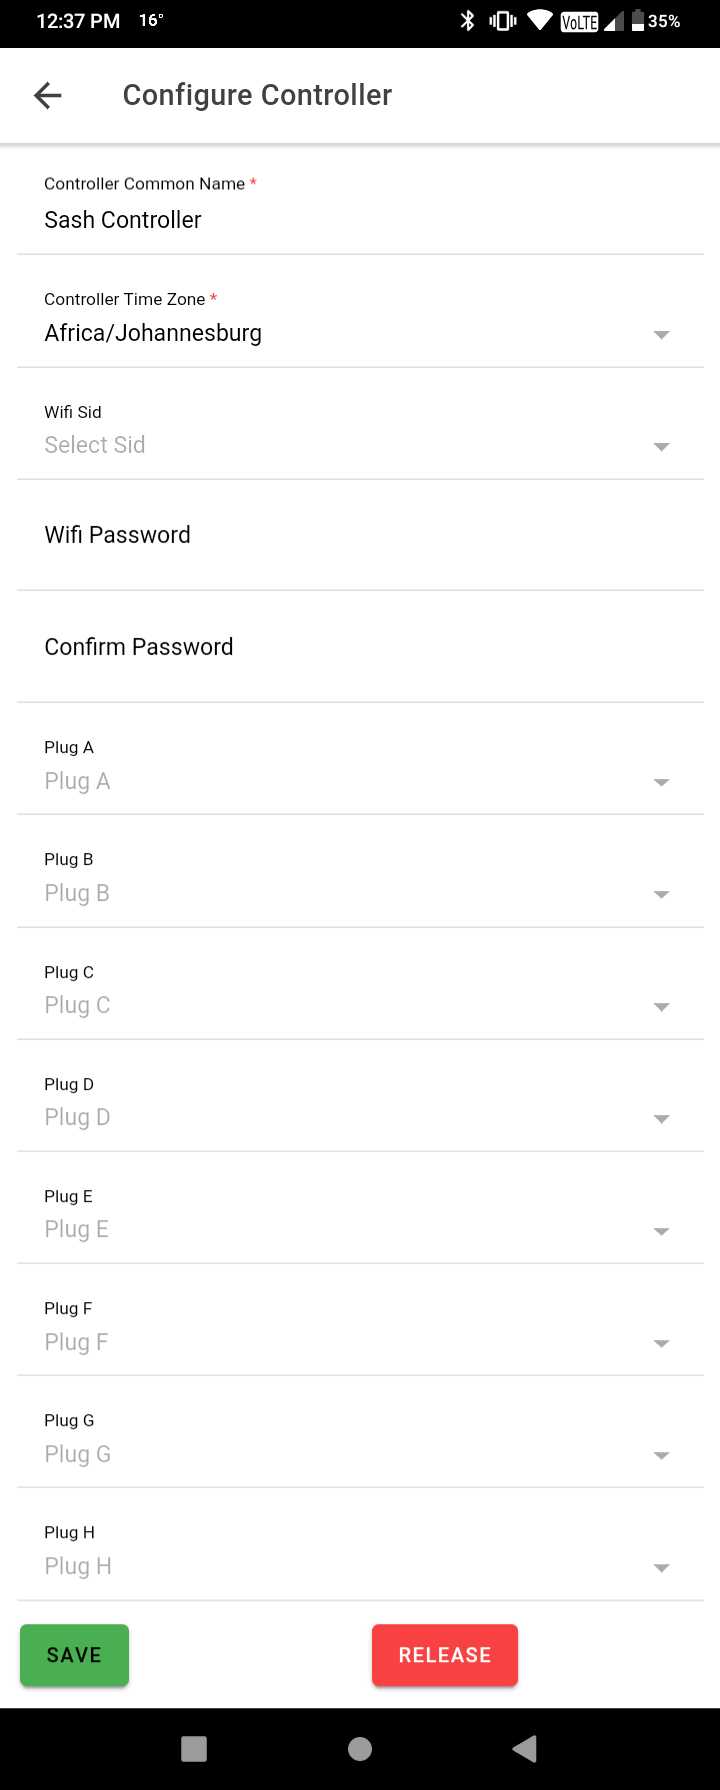
This can be used for:
Configuring a new common name for the controller to identify it in the system.
Configuring the time zone that the controller must run in.
Configuring common names for plugs. A list of predefined names is available for selection, or a unique name can be given.
Configuring new Wifi credentials if the SASH Controller should connect to a new Wifi hotspot.
The controller can also be released if you want to sell or give it to someone else.
-
Your newly purchased SASH Controller is now claimed onto your account and ready for use.
The next step will be to create a profile and a journal for the controller, so that you can start to control your devices.
Creating a SASH profile for my SASH Controller
This is a short tutorial on how to create a profile for your SASH Controller.
A profile consists of a set of rules that are transferred to the controller so that the controller can autonomously control devices plugged into it without human intervension.
Based on the inputs received through the temperature and humidity sensor and the flow of time, decisions are made by the controller based on environmental condition changes and plugs that are switched on and off.
Please note that creating a profile does not directly transfer it to the controller, a journal must first be created to initiate this process.
-
Navigate to the Profiles menu item and click to create a new profile.
-
Enter a new profile name and select the controller that this profile should be based on.
Note that the profile can be used on any controller(of the same type), not just the one selected here.
This just helps SASH to show useful common names for the plugs to easily configure a rule.
E.g. Which plug is the heater plugged into when configuring a rule for the minimum temperature in the grow room.
-
Each rule consists of a device, action and control.
The device is the plug that the rule must control. Either Plug A, Plug B or if a common name was given, Light or Heater.
The action is what must be done to the device when the rule is satisfied. For example, switching on the device.
The control is what must be true for the rule so that the action is performed. For example, temperature colder than 25 degrees celsius.

In the example above, Plug A will be switched on for as long as the temperature is higher than 25 degrees celsius.
-
For an action, there are two possibilities.
Either the plug can be switched on and will stay on for as long as the rule is satisfied, or the plug can be switched on and off periodically for the duration the rule is satisfied.

In the example above, Plug A is configured to be on for 25% of each 30 minutes while the temperature is higher than 25 degrees celsius.
As soon as the temperature goes above 25 degrees celsius, Plug A will be switched on for 7 and a halve minutes, then switched off for 22 and a halve minutes.
This cycle will continue if the temperature stays above 25 degrees celsius.
-
Each rule can have two controls configured that both must be satisfied for the rule to execute.

In the above example, Plug A will be switched on when the temperature is higher than 25 degrees celsius and the humidity is less than 60%.
-
Controls can make decisions based on different input conditions:
-
Temperature
Received from the sensor that is plugged into the SASH Controller.
-
Humidity
Received from the sensor that is plugged into the SASH Controller.
-
Time
Determined from the internal clock of the SASH Controller and synced from the internet through the Wifi connection.

In the above example, Plug B will be switched on between 6:00AM and 8:00PM every day.
-
Other plug's states
A rule can be setup to react to the state of another plug.

In the example above, Plug B will be switched on for 5 minutes, then switched off for 5 minutes while Plug A is on.
-
Other plug's states
A rule can be setup to react to the state of another plug.
In the example above, Plug B will be switched on for 5 minutes, then switched off for 5 minutes while Plug A is on.
-
-
The decisions that can be made on these inputs differ from the type of input.
-
For temperature and humidity readings, controls can be setup for:
-
Smaller Than

The control will be true when the temperature falls below the specified value and will stay true for as long as it is lower.
-
Greater Than

The control will be true when the temperature rises above the specified value and will stay true for as long as it is higher.
-
Ascending Range

The control will be true when the humidity rises above the 1st specified value(65%) and will stay true until it falls below the second value(55%).
-
Descending Range

The control will be true when the humidity falls below the 1st specified value(55%) and will stay true until it rises above the second value(65%).
-
-
For the states of the devices(plugs) on the controller:
-
Is Off

The control will be true when Plug B is not active and not giving power and will stay true for as long as it is deactivated.
-
Is On

The control will be true when Plug B is active and giving power and will stay true for as long as it is activated.
-
Has Daily Usage Less Than

The control will be true for as long as Plug B has not reached 60 minutes of total usage today. As soon has Plug B has been on for a total of 30 minutes for the day, it be false.
-
-
For the time on the controller:
-
Later

The control will be true for as long as the time of the day is later than 8:00.
This behaviour can be limited with added a second control to the rule for time earlier to limit the device to a period of the day. -
Earlier

The control will be true for as long as the time of the day is ealier than 22:00.
This behaviour can be limited with added a second control to the rule for time later to limit the device to a period of the day. -
Equal To

The control will be true for the specified minute of the day(8:00).
If you are controlling a device, that device will be on for the minute or if you taking a photo, the photo will be taken at 8:00.
-
-
-
Multiple rules can be configured for a single profile on the same device. The rules that are satisfied will execute and the rest will not be executed.
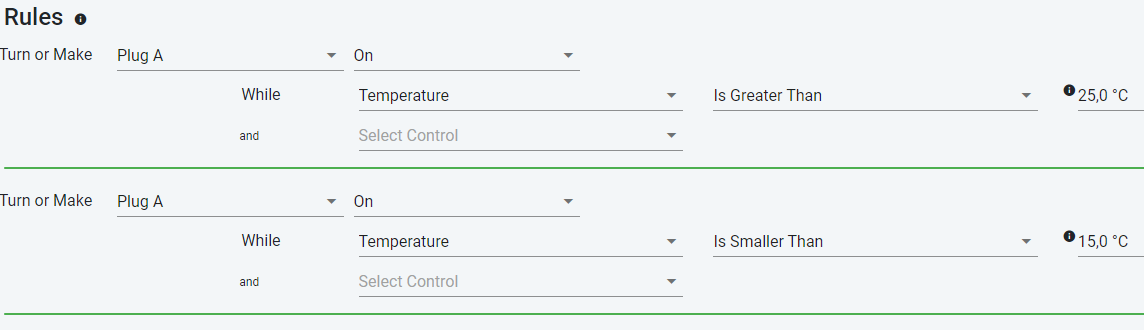
In the example above, Plug A will be switched on when the temperature is either above 25 degrees celsius or below 15 degrees celsius.
-
When configuring multiple rules for a device, the behaviour of the device can be changed depending on conditions.
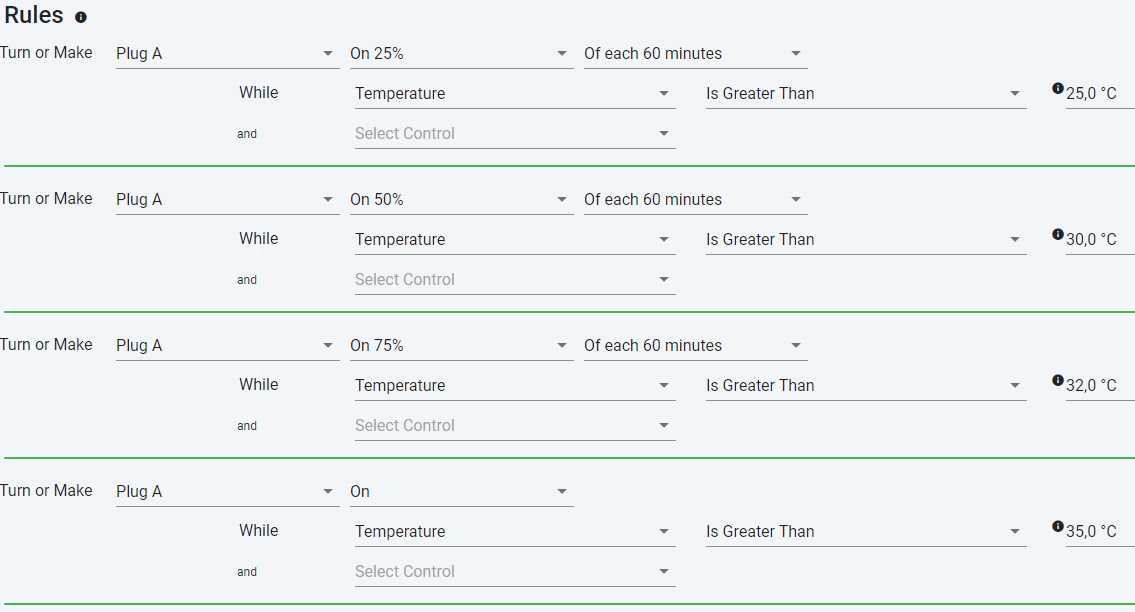
In the example above, Plug A will be switched on 25% of each hour when the temperature reaches 25 degrees celsius.
Plug A will then change its behaviour to be on for 50% of each hour once the temperature reaches 30 degrees celsius.
This will continue as the temperature climbs to where it will be on continuously once the temperature reaches 35 degrees celsius.
-
Profile alerts can be setup to notify you as to when certain conditions happened on your controller.
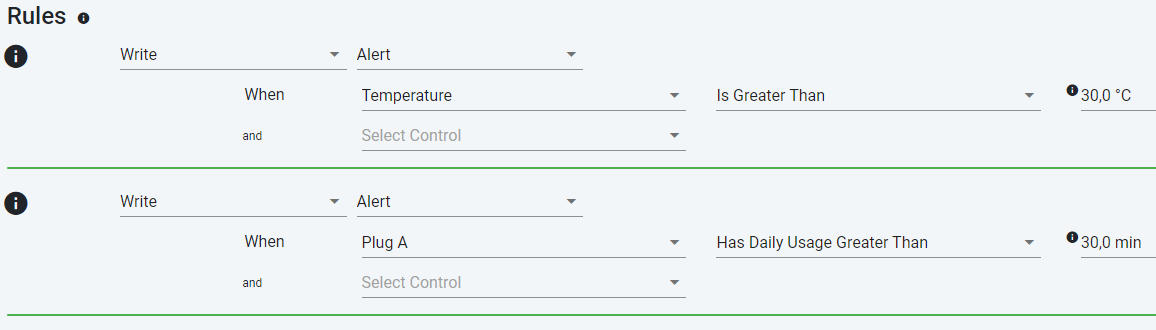
In the example above, an alert will be raised every time the temperature is above 30 degrees celsius.
An additional alert will also be rasied if Plug A has been on for more than 30 minutes for the day.
Note: These controls can be combined into a singel rule where an alert must be raised when Plug A has been on for more than 30 min today and the temprature is still above 30 degrees celsius.
-
Profile alerts can also be configured to wait for a condition to happen continuously before it is executed.
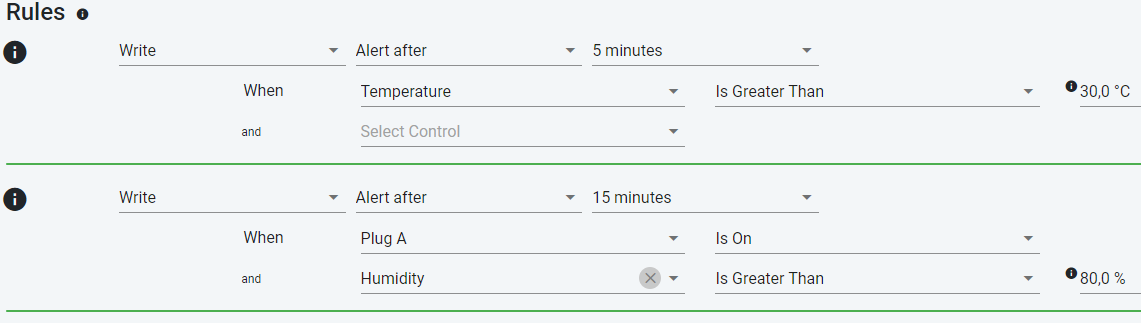
In the first example above, an alert is executed when the temperature is above 30 degrees celsius continuously for 5 minutes.
In the second a alert will be executed if Plug A is on for 15 continuous minutes and the temperature is also above 30 degrees celsius at than time.
-
Please note that creating a profile does not directly transfer it to the controller for execution.
A journal must first be created that will indicate which controller should be controlled with which profile.
Example rule situations
This is a short section with example rules for your SASH Profile.
Explaining what a rule will look like if you have a certain situation.
-
I am running a night cycle for my plants from 21:00 at night to 9:00 in the morning.
Create two rules for your light. One for the first part of the day and another for the last.
This will create a night cycle for your plants.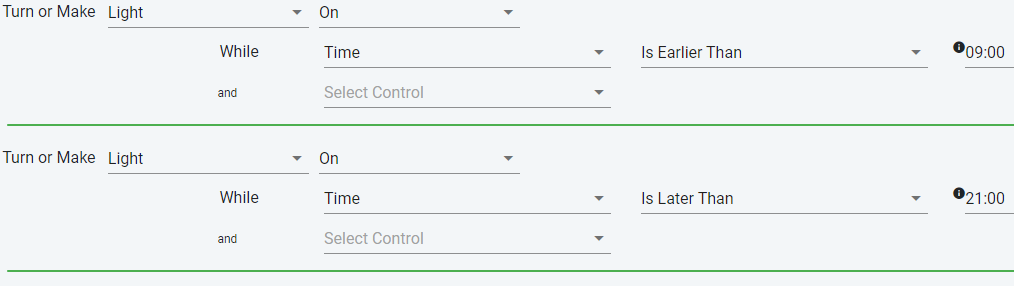
-
I am running a day cycle for my plants from 09:00 in the morning to 21:00 at night.
You only need to create one rule with two control to limit the time for the light from 09:00 to 21:00 in the same day.

-
I want a plug to always be no.
Create a rule for the device to be on while the time is later than midnight.

-
I want to keep an acceptable range for my temperature.
Create two rules. One for the cooler to control the upper limit and one for the heater to control the lower limit.
The heater will go on when the temperature falls below 16 degrees celcius and stay on until it is above 24 again.
The cooler will go on when the temperature rises above 28 degrees celcius and stay on until it is below 24 again.
If the temprature constantly stays between 16 degrees celcius and 28 degrees celcius, the heater and cooler will never go on.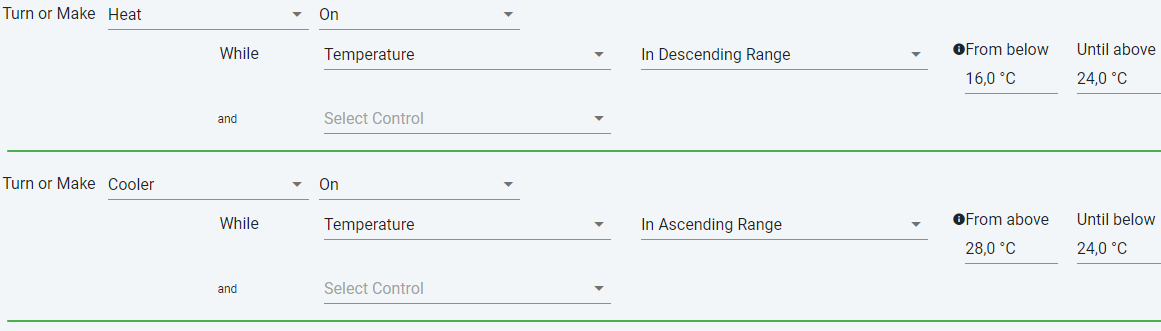
-
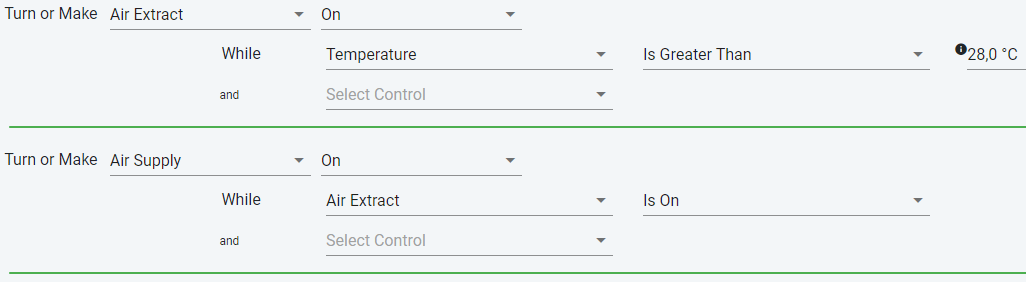
I want one plug to go on every time another plug goes on.
Lets say you want your air supply fan to also go on whenever your air extractor fan goes on.
Create a rule for the one fan to go on when the other does.Note: The air supply fan can have more rules to also put it on in other situations.
-
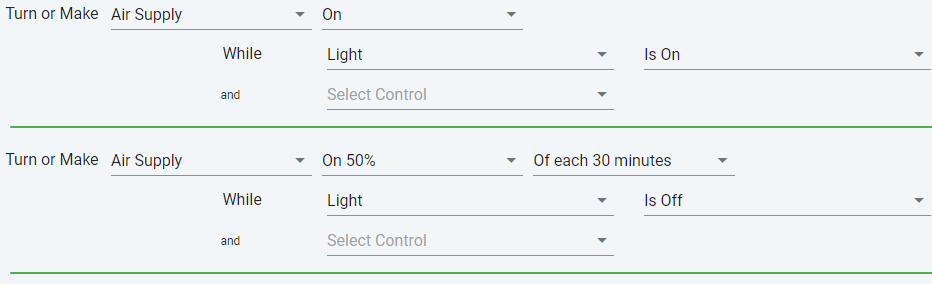
I want my intake fan to not be on all the time at night, it is making my room to cold.
First create a rule to have the air intake on constantly when the light is on and another rule to only put the air intake on 50% of each 30 minutes when the light is off. That is 15 minutes on and 15 minutes off continuously while the light is off.
-
But I want it to always be on if it gets too hot.
Assuming the previous rules already exist. Create another rule for air intake to also go on if the temperature gets too hot.
If it gets too hot during the night, the air intake will be on continiously until it drops below again.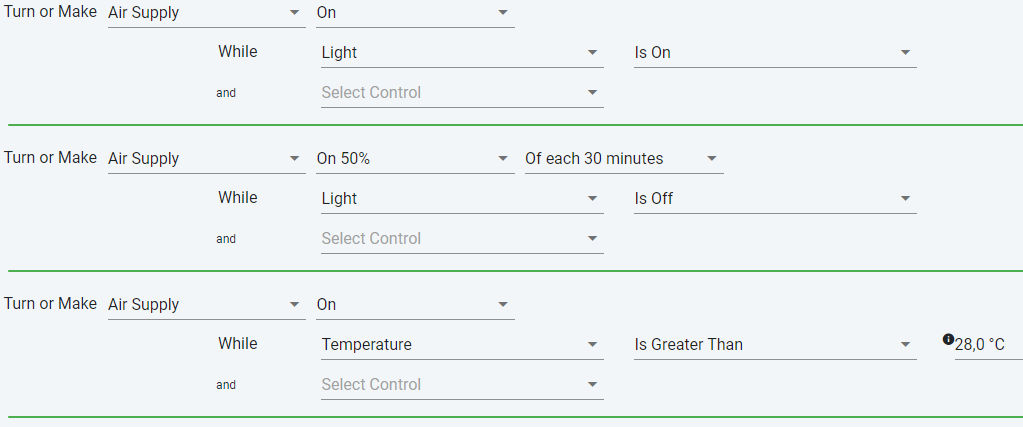
-
I want to be notified if my humidity is too high continiously for 5 minutes.
Create a rule to be alerted when the humidity is too high and does not drop below again for a 5 minute period.

Note: When the humidity drops below 60% within a 5 minute period, it will reset and not let you know.
Its only if the humidity stays to high for 5 minutes. -
I want my extractor fan to go on when the humidity it too high, but only if it is hot enough.
Create a rule for the extractor fan with two controls. One for the humidity and one for the temperature.

Note: Both the controls must be true before the extractor will go on.
If the temperature drops, but not the humidity, the extractor will go off if it gets to cold. -
I want to keep different temperature ranges during the day and night.
Create two rules for the heater, one for the exceptable temperature range during the day and another for the axceptable temperature range during the night.
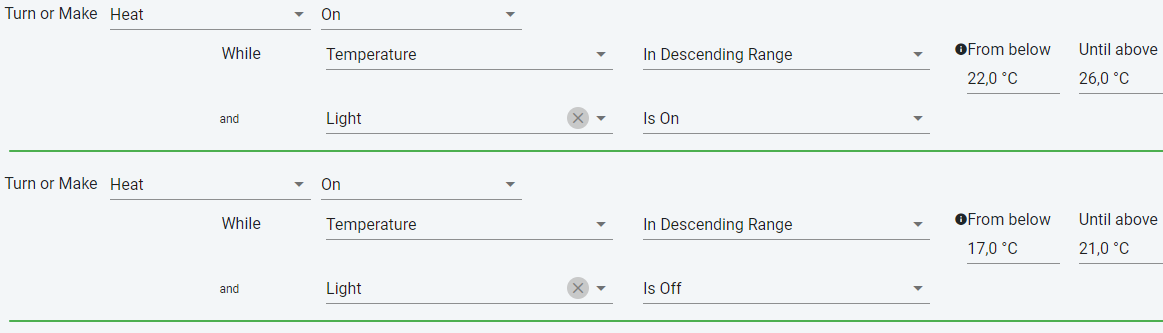
Note: The example only shows the rules when the temperature is too low. You can make more rules for a cooler or extractor fan to control the temperature when it gets too hot, also with different value for the day and night.
-
I want to keep my light on after the schedule shutdown time if I had loadshedding.
Create a rule for the light to be on for a scheduled time every day.
Additionally create another rule that if the time is after the scheduled shut down time, but the light has not been on for 12 hours today, to keep it on until 12 hours for the day has been reached.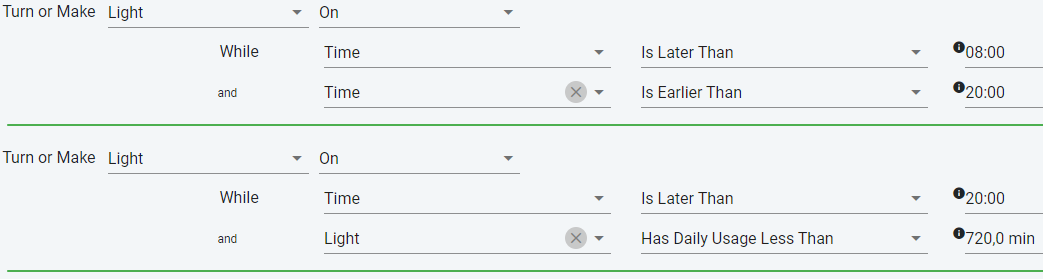
Note: Depending on the duration of the load shedding, the light will stay on for until 12 hours for the day has been reached..
Create a SASH Journal and start using my SASH Controller
This is a short tutorial on how to create and use a journal for your SASH Controller.
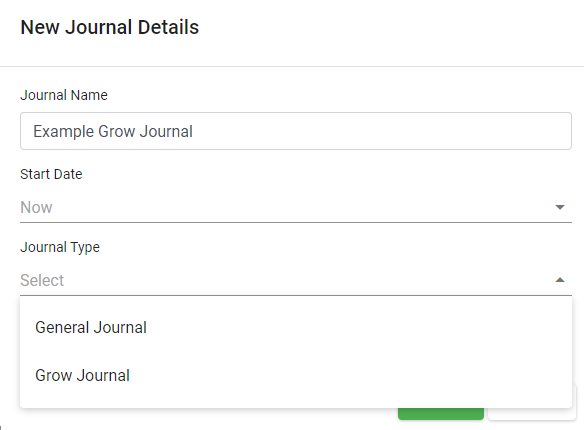
In SASH, everything in controlled from a journal and two journal types are available when creating a new journal.
General Journal Type: For General use were only journal entries are required.
Grow Journal Type: Advanced features geared at indoor growers. SASH Controller compatible.
For this tutorial, the grow journal type will be explained which is controlling a SASH Controller.
-
Navigate to the Journals menu item and click on the Create new Journal button.
-
Provide a name for the journal, a start date and time and select the Grow Journal type. You can leave the start date to indicate the journal must start as soon as you save it.
-
After the new journal has been created, the different sections of the journal is displayed.

From here you can navigate to the desired section to change your journal's behaviour.
Note that from here on down this screen will be called the Journal Management Dashboard.
-
Click on the Journal Details button to specify grow specific information like the equipment used, the stage of your grow and the place of your grow.
On each screen, use the Back button to navigate back to the Journal Management Dashboard screen if nothing was changed
or the Save button to save the new information and take you back to the Journal Management Dashboard screen automatically.
-
Next we want to select which controller we want to control with this journal.
Click on the Controller button and select your controller from the list and save.

Please note that in the case where you have multiple controllers, that once a controller is selected, it cannot be changed again.
-
When managing a controller, you can be alerted of different activities when they take place.

To open the alerts screen, use the ALERTS button above.
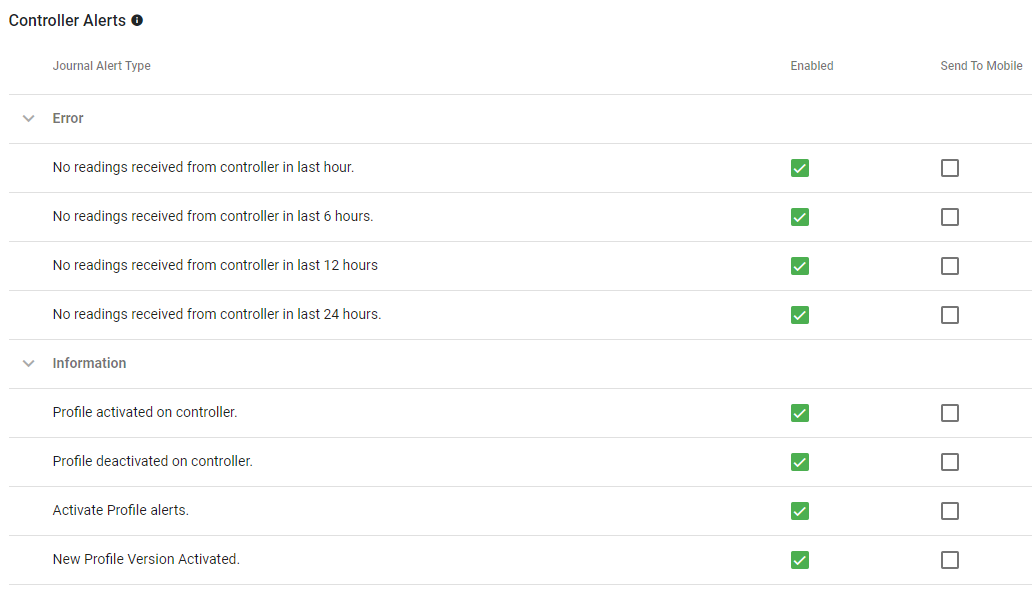
In the example above a journal alert will be created when:
- The controller does not send any readings.
- A new profile is activated on the controller.
- An old profile is deactivated on the controller.
- A new version of the existing profile is activated on the controller.
- If there are any profile alerts configured, they will be included.
-
Based on the profile running on the SASH Controllers, it determines when to switch a plug on or off. SASH is a Journal centric system, the profiles meant for the controller are configured in Journal Management.

To open the profile selection screen, use the PROFILE SCHEDULE button above.
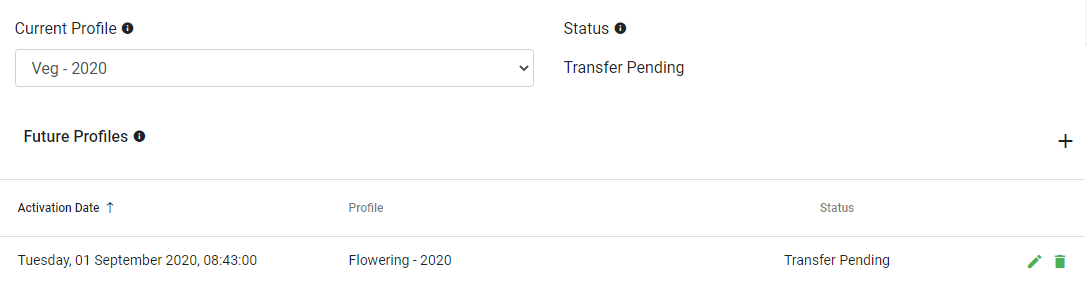
A controller can have one current active profile (e.g. Veg - 2020 above) and one future profile (e.g. Flowering - 2020 above) that will switch over automatically when its activation time is reached.
Note: Pro license users get multiple future scheduled profiles.
-
As part of a grow journal, the plants that are being grown can be configured for later reference in other aspects of a grow journal.
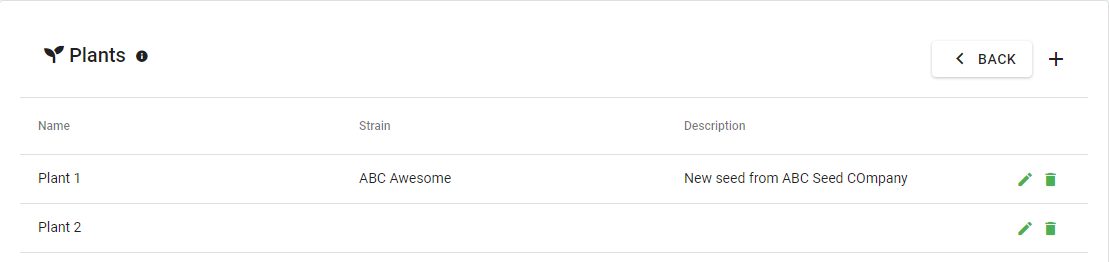
In the example above, two plants are configured for this grow journal.
They can then be referenced in other places in the journal. E.g. Watering journal entries. -
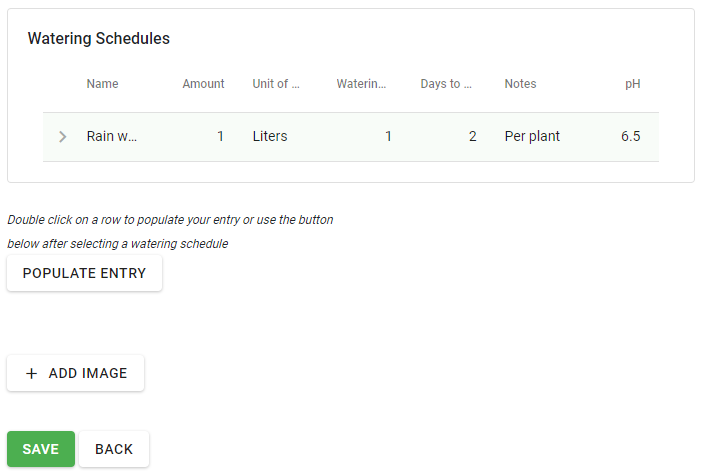
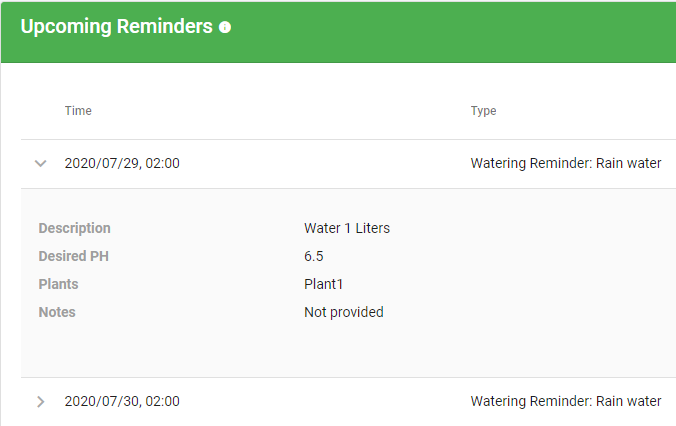
As part of a grow journal, watering schedules can be configured to assist you in watering your grow correctly and on time.
These schedules can be configured to create reminder. Which will remind you at the correct time of what to do.
In the example above, 1 watering schedule has been configured with the following details:
1 liter of rainwater from the 2nd tank on a watering day, then skip 2 days of no watering and repeat this schedule.
These watering schedules can also generate reminders for you. If you require that these reminders are sent to your
SASH mobile application as push notification, enable and schedule for which time of day to remind you. E.g. (below).

In the exmaple above, the Watering Schedules will create reminders that will remind you at 8:00 in the morning of a day that has reminders.
-
Additional to watering schedule, a grow journal can also be configured with nutrient schedules and reminders.
As with watering schedules, these are used to follow a predefined schedule with your grow.
In the example above, a new nutrient schedule is configured with the following details:
- Use 4ml Grow Juice nutrient.>
- Diluted with 1L of water.
- Feed this nutrient from week 3 to week 12 of the grow.
- Feed this nutrient on a Monday when applicable.
- The desired ph for feeding solution is 6.5.
- The feeding must be performed on plant 1 and plant 2.
-
When you are finished with a journal and want to end it, click on the End Journal button on the Journal Management dashboard.
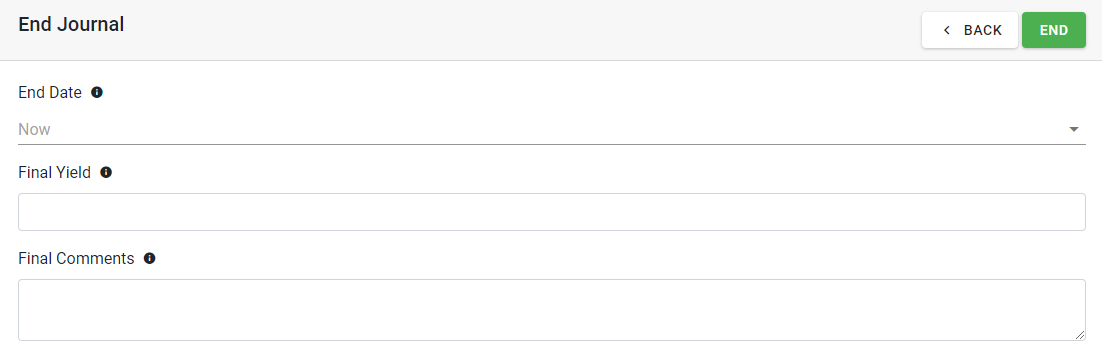
This will show the end journal screen, where the End Date can be specified to a future date or left empty, so that the journal closes as soon as you click save.
Additionally fields are provided where you can provide the yield from your grow with any final comments that you want to remember for later.
Create a free Grow Journal
This is a short tutorial on how to create a free grow journal that does not manage a controller.
A general journal type and grow journal type is available when creating a new journal.
For the purpose of this tutorial, the grow journal will be explained that is NOT controlling a SASH Controller.
-
Navigate to the Journals menu item and click on the Create new Journal button.
-
Provide a name for the journal, a start date and time and select the Grow Journal type. You can leave the start date to indicate the journal must start as soon as you save it.
-
After the new journal has been created, the different sections of the journal is displayed.
From here you can navigate to the desired section to change your journal's behaviour.
Note that from here on down this screen will be called the Journal Management Dashboard.
-
Click on the Journal Details button to specify grow specific information like the equipment used, the stage of your grow and the place of your grow.
On each screen, use the Back button to navigate back to the Journal Management Dashboard screen if nothing was changed
or the Save button to save the new information and take you back to the Journal Management Dashboard screen automatically.
-
As part of a grow journal, the plants that are being grown can be configured for later reference in other aspects of a grow journal.
In the example above, two plants are configured for this grow journal.
They can then be referenced in other places in the journal. E.g. Watering journal entries. -
As part of a grow journal, watering schedules can be configured to assist you in watering your grow correctly and on time.
These schedules can be configured to create reminder. Which will remind you at the correct time of what to do.
In the example above, 1 watering schedule has been configured with the following details:
1 liter of rainwater from the 2nd tank on a watering day, then skip 2 days of no watering and repeat this schedule.
These watering schedules can also generate reminders for you. If you require that these reminders are sent to your
SASH mobile application as push notification, enable and schedule for which time of day to remind you. E.g. (below).
In the exmaple above, the Watering Schedules will create reminders that will remind you at 8:00 in the morning of a day that has reminders.
-
Additional to watering schedule, a grow journal can also be configured with nutrient schedules and reminders.
As with watering schedules, these are used to follow a predefined schedule with your grow.
In the example above, a new nutrient schedule is configured with the following details:
- Use 4ml Grow Juice nutrient.>
- Diluted with 1L of water.
- Feed this nutrient from week 3 to week 12 of the grow.
- Feed this nutrient on a Monday when applicable.
- The desired ph for feeding solution is 6.5.
- The feeding must be performed on plant 1 and plant 2.
-
When you are finished with a journal and want to end it, click on the End Journal button on the Journal Management dashboard.
This will show the end journal screen, where the End Date can be specified to a future date or left empty, so that the journal closes as soon as you click save.
Additionally fields are provided where you can provide the yield from your grow with any final comments that you want to remember for later.
Using the SASH Journal Dashboard
This is a short tutorial on how to use the basic features of the journal dashboard.
In this tutorial a grow journal will be used as an example, which is controlling a SASH Controller with an active profile.
The journal dashboard is where all the data related to a journal is displayed for investigation and referencing.
-
At the top of the dashboard is the general journal information and the actions for performing activities.
In the example above, you can see:
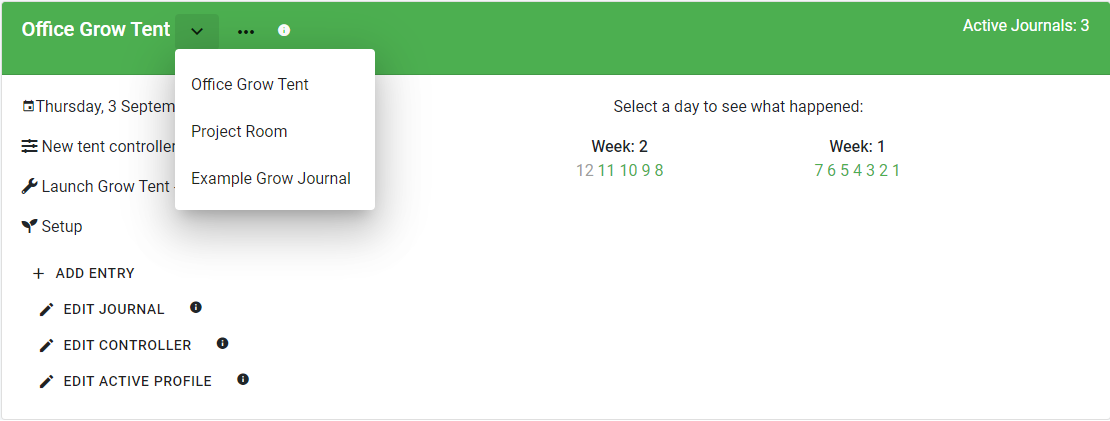
At the top left, a drop down to select between your active journals and view their details.
Below that is the date and time the journal was started.
Below that is the name of the controller that is currently being managed by the journal (Office Controller).
Below that is the name of the profile running on the controller (Grow Tent in office).
Below that is the growing stage the plants are currently in (Vegetation).
On the right, the list of days for the journal, group per week.
At the bottom all the actions that can be performed on the journal.
-
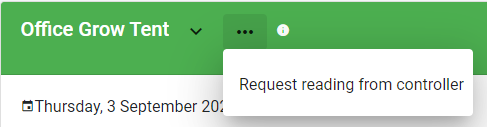
When your journal is managing a controller, an option will be avialable where you can request a fresh reading to bee taken on the controller.

The reading will be saveed in your journal as a user journal entry.
-
SASH journals provide the ability to add different journal entries to your journal.
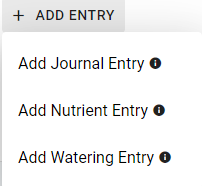
Above are the 3 options for grow journals:
Add Journal Entry: This entry type is intended for a user to add information to a journal regarding something general that happened in the journal.
Add Nutrient Entry: This entry type is intended for a user to add information about a nutrient feeding performed on the plants.
Add Watering Entry: This entry is intended for a user to add information about a watering performed on the plants.
With all these entries, you can add images and reference specific plants.
-
Below the journal heading, the list of upcoming reminders will be displayed if you configured nutrients or water schedules and enabled reminders.
-
Below the journal reminders, details for each day will be displayed with navigation button to go back and forth in the journal.

-
The first details displayed for a journal day is the images taken by the controller's camera.
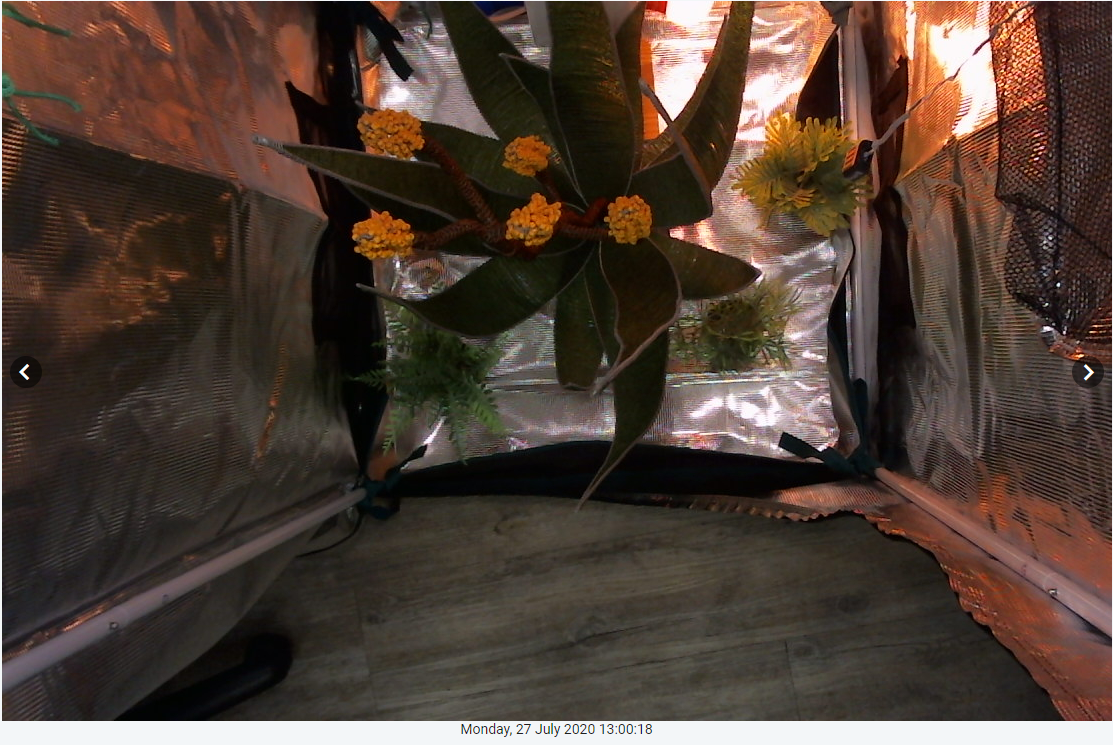
To navigate between the image, click on the arrow buttons on the sides of the image.
Additionally, to view the image in full screen mode, just click on it to expand.
-
The following information per journal day are the graphs displaying the temperature/humidity readings received from the SASH Controller for the day.
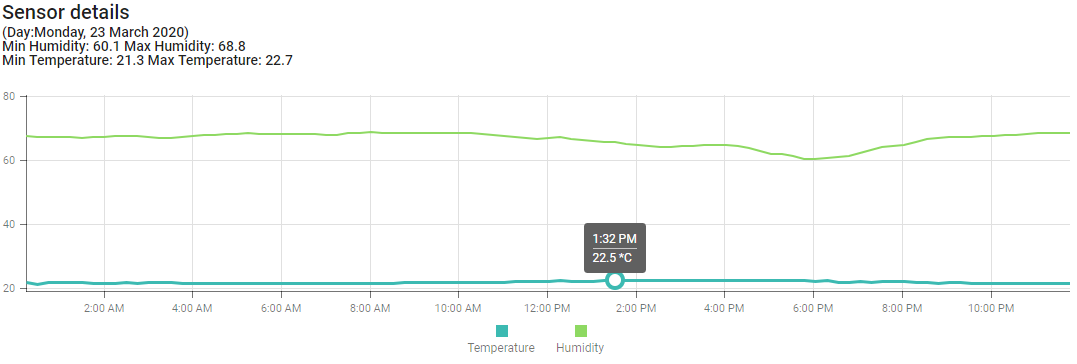
Hovering over the lines will display the time of day and actual value for any point on the lines.
-
The following information per journal day are the graphs displaying how long the SASH Controller switched on each plug for a day.
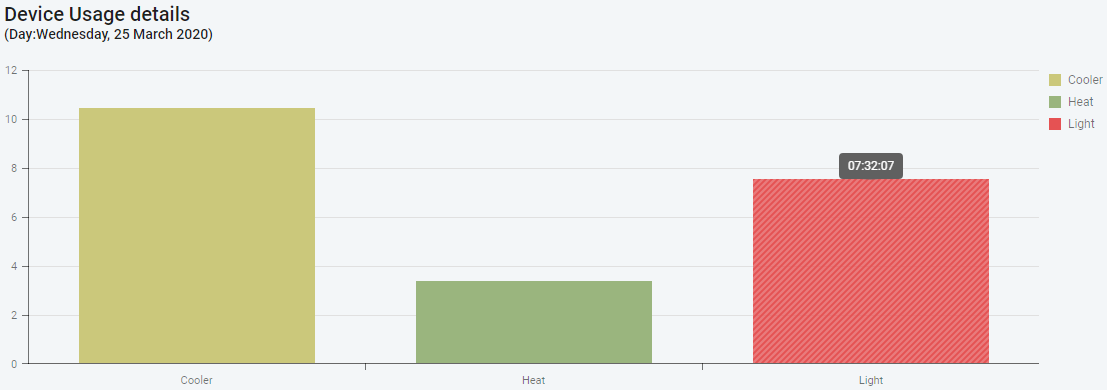
Hovering over the bar will display the exact amount of time for each plug.
Note: In the example above each plug has been given a common name to better identify what is plugged into it.
-
The following information per journal day are the journal and profile alerts, created either by the system or the SASH Controller.

Please note that Journal and Profile alerts will be shown as separate grids, but only Journal alerts are in the example.
-
The final information per journal day are all the journal entries for the day. This will include the general, nutrient and watering entries.
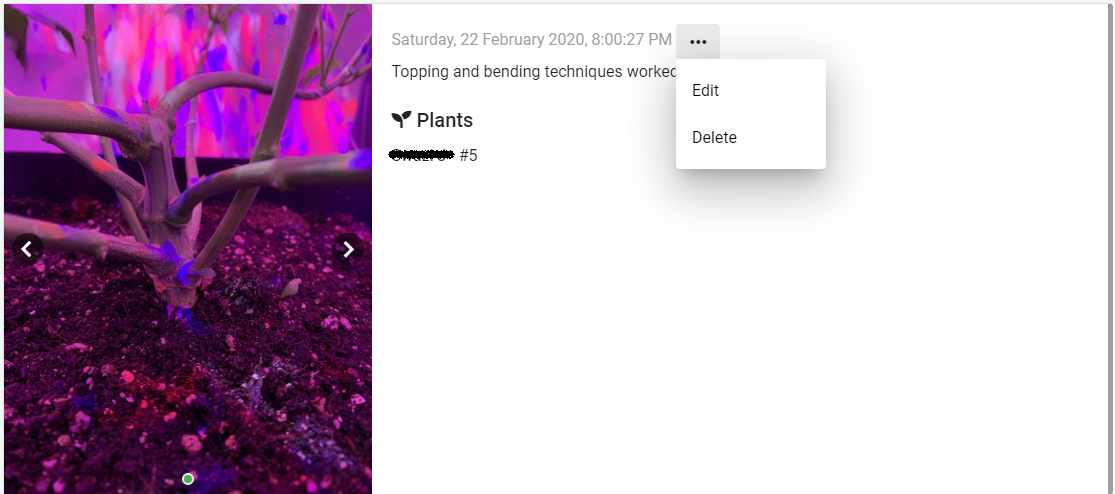
In the above example of a general journal entry, you can see the option to edit and delete the journal entry is available as well.
Adding Journal Entries to my SASH Journal
This is a short tutorial on how to add journal entries to your active SASH Journal.
A very important part for any journal, is adding entries to the journal for later reference and investigation.
-
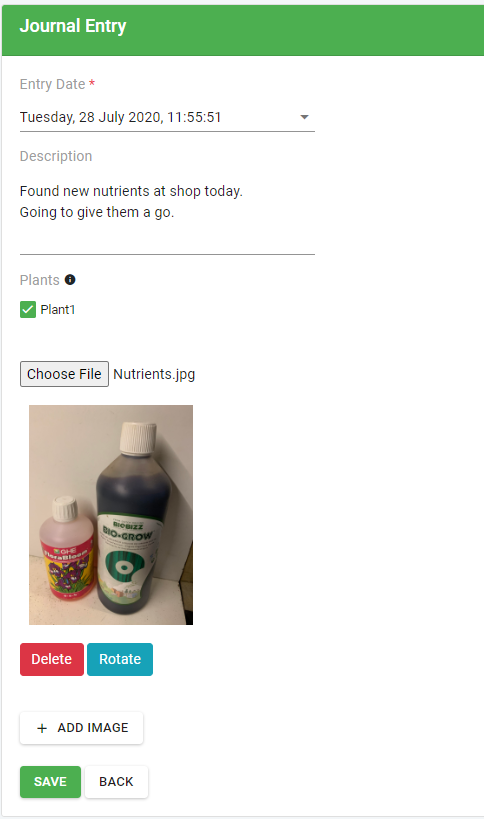
General Journal entry.
The following details can be provided for a general journal entry:
Entry Date: Date and time for the entry. This must be in the past and not earlier than the start of the journal.
Description: User provided description for the entry.
Plants: If plants were configured for a grow journal, the plants for which the entry is applicable for can be selected here.
Images: Multiple uploaded images for the entry to provide a visual explanation.
-
Nutrient Journal Entry.
The following details can be provided for a nutrient journal entry, also known as a feeding:
Entry Date: Date and time for the entry. This must be in the past and not earlier than the start of the journal.
Description: User provided description for the entry. e.g. Feeding or First feeding for flowering
Name: Name of the nutrient used.
Nutrient Amount: Amount of nutrient used.
Nutrient Units: What unit the nutrient amount was measured in.
Diluent Amount: The amount of diluent (e.g. water) used to dilute the nutrient.
Diluent Units: What unit the diluent was measured in.
Notes: Any additional notes.
Plants: If plants were configured for a grow journal, the plants for which the entry is applicable for can be selected.
pH: The pH of the solution before the feeding.
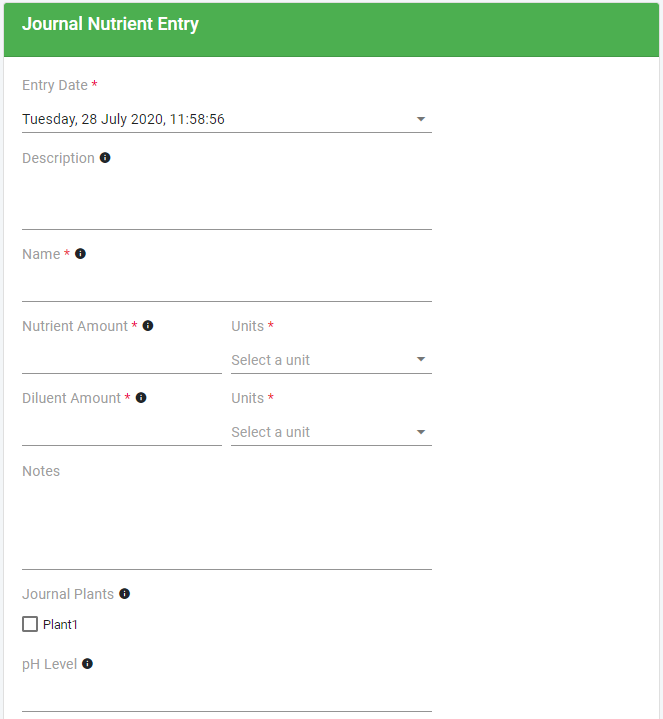
Additional information for entry:
If you pre-configured a nutrient schedule for your journal, that schedule can be selected, and the entry details can be pre-populated with these configured values.
Images: Multiple uploaded images for the entry to provide a visual explanation.

-
Watering Journal Entry.
The following details can be provided for a watering journal entry:
Entry Date: Date and time for the entry. This must be in the past and not earlier than the start of the journal.
Description: User provided description for the watering technique. e.g. Filled autopot or Poured directly onto plants.
Name: Indicating what was used for watering. e.g. Water, Rainwater or Distilled water.
Diluent Amount: The amount of diluent used to water the plants.
Diluent Units: what unit the diluent was measured in.
Notes: Any additional notes.
Plants: If plants were configured for a grow journal, the plants for which the entry is applicable for can be selected.
pH: The pH of the diluent (water).
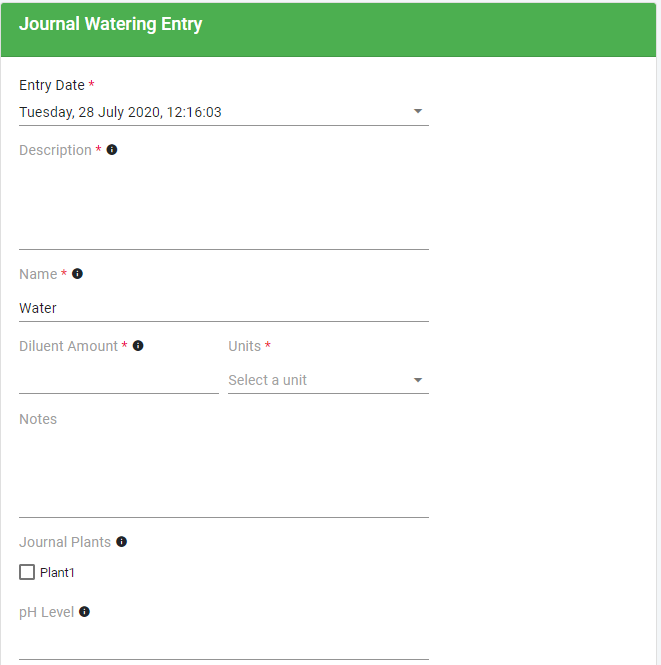
Additional information for entry:
If you pre-configured a watering schedule for your journal, that schedule can be selected, and the entry can be pre-populated with these configured values.
Images: Multiple uploaded images for the entry to provide a visual explanation.